Creating Your Custom LLD in Zabbix
A complete guide to creating a custom Low-Level Discovery in Zabbix.
From time to time, I need to develop a monitoring routine that involves using a custom discovery rule in Zabbix. This usually happens because of a specific need that the tool itself is not yet capable of handling naturally.
After a specific request from a colleague in the Zabbix Brasil community, I decided to create this post to provide a general idea of how the LLD (Low-Level Discovery) feature works and how you can create your own custom rule based on your needs.
For this example, I will be using PowerShell, focusing on those who manage Microsoft environments. However, you can use any language that your system supports, as the script we will create will be executed by the monitored host itself, and not by the Zabbix Server.
The LLD
The LLD feature, for those who don’t know, allows Zabbix to dynamically create items, triggers, and graphs for all the discovered objects on the monitored device. You can find this definition and more information on the official documentation page.
The automatic discovery process works as follows: a routine is executed that lists the objects to be discovered in a JSON output. Based on this output, the items, triggers, and graphs are created from the prototypes that you will define. These prototypes use the JSON outputs as parameters to create the monitoring elements.
The LLD documentation is clear and straightforward, and it is available in languages other than English.
The Script
Let’s suppose we need to determine the size of each file in a pre-determined folder. These could be system files, whose sizes need to be individually monitored.
Hint: PowerShell ISE or Visual Studio Code are great IDEs for developing your scripts.
Hint: o Powershell ISE ou o Visual Studio Code são ótimas IDEs para você desenvolver seus scripts.
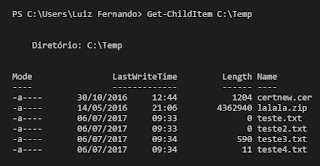
First, let’s create a way to list these files and their sizes. To do that, let’s simply ask the system to print the folder’s files and check what we get from that:
1
Get-ChildItem C:\Temp
Wow! With just this cmdlet, we were already able to list the files in the folder along with their sizes.
Now, let’s test how to print only the size of a specific file. Suppose we need to know the size of a file called lalala.zip:
1
Get-ChildItem C:\Temp\lalala.zip
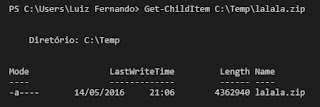 Printing properties of a specific file
We were able to list the information for the file we want, but we also retrieved other details that we don’t need and that are not important for monitoring. With an output like this, we won’t be able to monitor just the file size. To fix this, we put the previous command in parentheses and specify that we only want the data from the Length column, which represents the file size.
1
(Get-ChildItem C:\Temp\lalala.zip).Lenght
Great! We’ve successfully configured the script to print only the data we need. Now, we need to make the script run dynamically, so that for each file in the folder, the PowerShell prompt behaves differently.
To achieve this, we can use a concept similar to Bash in Linux, which uses variables like $1, $2, and $n as parameters passed to a script. The only difference is that in PowerShell, this array starts at 0, using $args[x], wherex is the position of the parameter to be passed.
In the command below, for example, abc is $args[0] and 123 is $args[1].
1
Write-host abc 123
With that in mind, we replace the file path in the script with the variable $args[0]. This way, when we execute the script, passing the file name as a parameter, it will return the data for the specified file. Note that the beginning of the path is fixed, but it could be made fully dynamic.
1
(Get-ChildItem C:\Temp\$args[0]).Lenght
That said, save the script and run it via PowerShell, passing the file name as a parameter to get the size of the file.
1
C:\temp\monit-arquivos.ps1 lalala.zip
 Showing size using file as a script parameter
Structuring the script
Now that we know how to collect the data we will monitor, let’s structure the script to enable it to discover (LLD) all the items and to serve as the monitoring script to retrieve the data itself. I personally like the logic that if the script does not receive any valid parameters, it runs the LLD.
So, we will structure this routine to monitor a specific file if I pass the parameter “tamanho” (size in Portuguese). As I am Brazilian and will have this post in multiple languages, I reused the same term. This way, if the first parameter ($args[0]) that the script receives is the string “tamanho”, it will print the file size of the file declared as the second parameter ($args[1]).
The first part of the script is as follows:
1
2
3
4
5
6
# Script to monitor the size of a file inside a folder

# If the first parameter is the string "tamanho"
If ($args\[0\] -eq "tamanho") {
  (Get-ChildItem "C:\Temp\"$args[1]).Length
}
Now save the script and run it to check if it works as expected. We will pass the first parameter as tamanho and the second as the file name:
1
C:\Temp\monit-arquivos.ps1 tamanho lalala.zip
 Informing action and file as parameters
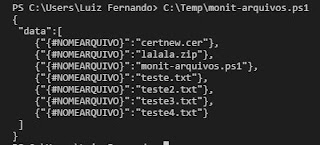
Cool! Now we move on to the second part, where we will implement the LLD itself. The code block below iterates through all the files in the specified directory and prints them in JSON format, identified by the macro {#NOMEARQUIVO} (filename). This macro (which can represent many values) is a variable that will be used by Zabbix to name items, triggers, etc.”
1
2
3
4
5
6
7
8
9
10
11
12
13
14
15
16
17
18
19
20
21
22
23
24
25
26
27
28
29
30
31
# If not, perform LLD
Else {
  # Fills the array arquivos with the list of files in the folde
  $arquivos = (Get-ChildItem "C:\temp\").Name

  # Sets the counter to 0
  $i = 0

  # Starts JSON
  Write-Host "{"
  Write-Host " `"data`":["

  # For each file name
  Foreach ($arquivo in $arquivos) {
    # Counter to avoid printing a comma after the last element
    $i++

    # If the current file name is not empty
    If($arquivo -ne "") {
      Write-Host -NoNewline " {""{#NOMEARQUIVO}"":""$arquivo""}"

    # If it is not the last element, print "," at the end
      If ($i -lt $arquivos.Count) {
        Write-Host ","
      }
    }
  }
  Write-Host
  Write-Host " ]"
  Write-Host "}"
}
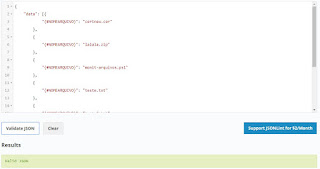
Run the script to check the JSON output, which you can validate using any JSON validator available on the internet. Here, I used JSONLint.
With that done, we can combine the two parts of the script, and we are ready.
1
2
3
4
5
6
7
8
9
10
11
12
13
14
15
16
17
18
19
20
21
22
23
24
25
26
27
28
29
30
31
32
33
34
35
36
37
38
# Script to monitor the size of files in a folder

# If the first parameter is the string "tamanho"
If ($args[0] -eq "tamanho") {
  (Get-ChildItem "C:\Temp\$args[1]").Length
}

# If not, perform LLD
Else {
  # Fills the array 'arquivos' with the list of files in the folder
  $arquivos = (Get-ChildItem C:\temp\).Name

  # Sets the counter to 0
  $i = 0

  # Starts JSON
  Write-Host "{"
  Write-Host " `"data`":["

  # For each file name
  Foreach ($arquivo in $arquivos) {
    # Counter to avoid printing a comma after the last element
    $i++

    # If the current file name is not empty
    If($arquivo -ne "") {
      Write-Host -NoNewline " {""{#NOMEARQUIVO}"":""$arquivo""}"

        # If it is not the last element, print "," at the end
      If ($i -lt $arquivos.Count) {
        Write-Host ","
      }
    }
  }
  Write-Host
  Write-Host " ]"
  Write-Host "}"
}
The Host
With the script completed, we will add it to the configuration file of the host to be monitored, creating a key called monit-arquivos via UserParameter. The parameter used is simply a custom monitoring key that, when executed, will call the command/script declared in the .conf file.
Find the configuration file of your host and add the following line (in my test, I have the script saved in C:\Temp):
1
UserParameter=monit-arquivos[*],powershell.exe -NoProfile -ExecutionPolicy Bypass -file "C:\Zabbix\monit-arquivos.ps1" "$1" "$2"
This tag says we are creating a key named monit-arquivos, which will accept parameters ($1 and $2) and when called will execute the command that is after the comma. In case you are not sure, have a search about other powershell parameters used in this line. Note that the parameters are declared as $1 and $2, and that is the default setting of Zabbix’s configuration file. That has nothing to do with the language used in my script.
To test that, eun the below command in a command prompt.
1
powershell.exe -NoProfile -ExecutionPolicy Bypass -file "C:\Zabbix\monit-arquivos.ps1"
After that, save the file and restart the Zabbix agent in the host. You now can test the collect using this item direct in the Zabbix server, executing the command below. Note the syntax used in the monitoring key we used.
1
zabbix_get -k monit-arquivos[tamanho,lalala.zip]
The Zabbix
Now we will create our discovery process. Create a new template (or edit an existing host) and go to the tab named Discovery Rules. Click on the option Create discovery rule.
In the next screen, give a name to your discovery rule and enter the key name as the same one we specified in the .conf UserParameter. We are configuring how much time Zabbix will take to run a new discovery process, which is simply executing the script we created without any parameters passed
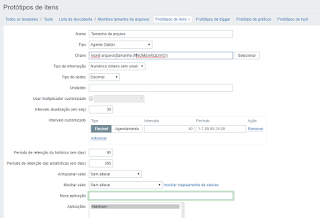
With that ready, go to the option for Item Prototypes and add the monitoring item itself. Here, we add the key we created and pass along the parameters that we tested previously
Now wait for the time you configured for the collection and check the Recent Data menu to see if the data is being collected correctly. Errors can be checked both in the agent log file and on the server.
I hope you find this useful. Have a nice day!

